출처
python2 설치
pi@orangepiplus2e:~/klipper$ sudo apt install python-is-python2 python2-minimal python-dev-is-python2 gcc-arm-none-eabiKlipper 설치전 설치 도메인 추가
Klipper 소스 다운로드
pi@orangepiplus2e:~/klipper$ sudo vi /etc/resolv.conf8.8.8.8 도메인 서버 추가
nameserver 8.8.8.8
네트워크 서비스 재시작
pi@orangepiplus2e:~/klipper$ sudo systemctl restart networking.serviceKlipper 설치
Klipper 소스 다운로드
pi@orangepiplus2e:~$ git clone https://github.com/Klipper3d/klipperKlipper 설치전 종속성있는 패키지 자동 설치
pi@orangepiplus2e:~$ sudo apt purge command-not-found
pi@orangepiplus2e:~$ sudo apt --purge autoremove
pi@orangepiplus2e:~$ sudo bash -c 'apt update && apt full-upgrade && apt autoremove && apt clean'
pi@orangepiplus2e:~$ cd ~/klipper
pi@orangepiplus2e:~/klipper$ scripts/install-octopi.sh


###### Running apt-get update...
기존:1 https://mirrors.bfsu.edu.cn/armbian bullseye InRelease
기존:2 http://deb.debian.org/debian bullseye InRelease
기존:3 http://deb.debian.org/debian bullseye-updates InRelease
기존:4 http://deb.debian.org/debian bullseye-backports InRelease
기존:5 http://security.debian.org bullseye-security InRelease
패키지 목록을 읽는 중입니다... 완료


###### Installing packages...
패키지 목록을 읽는 중입니다... 완료
의존성 트리를 만드는 중입니다... 완료
상태 정보를 읽는 중입니다... 완료
주의, 'python-dev' 대신에 'python-dev-is-python2' 패키지를 선택합니다
주의, 정규식 'libusb-1.0'에 대해 'libusb-1.0-0-dev'을(를) 선택합니다
주의, 정규식 'libusb-1.0'에 대해 'libusb-1.0-doc'을(를) 선택합니다
주의, 정규식 'libusb-1.0'에 대해 'libusb-1.0-0'을(를) 선택합니다
binutils-arm-none-eabi is already the newest version (2.35.2-2+14+b2).
binutils-arm-none-eabi 패키지는 수동설치로 지정합니다.
build-essential is already the newest version (12.9).
gcc-arm-none-eabi is already the newest version (15:8-2019-q3-1+b1).
libusb-1.0-0 is already the newest version (2:1.0.24-3).
libusb-1.0-0 패키지는 수동설치로 지정합니다.
python-dev-is-python2 is already the newest version (2.7.18-9).
The following additional packages will be installed:
  libftdi1 libhidapi-libusb0 libnewlib-dev libusb-0.1-4 python3-appdirs python3-distlib python3-filelock
  python3-importlib-metadata python3-more-itertools python3-six python3-virtualenv python3-zipp
제안하는 패키지:
  dfu-programmer avrdude-doc gcc-doc ncurses-doc libnewlib-doc
추천하는 패키지:
  libstdc++-arm-none-eabi-newlib
다음 새 패키지를 설치할 것입니다:
  avr-libc avrdude binutils-avr dfu-util gcc-avr libffi-dev libftdi1 libhidapi-libusb0 libncurses-dev
  libnewlib-arm-none-eabi libnewlib-dev libusb-0.1-4 libusb-1.0-0-dev libusb-1.0-doc libusb-dev python3-appdirs
  python3-distlib python3-filelock python3-importlib-metadata python3-more-itertools python3-six
  python3-virtualenv python3-zipp stm32flash virtualenv
0개 업그레이드, 25개 새로 설치, 0개 제거 및 0개 업그레이드 안 함.


###### Installing system start script...


###### Installing system start configuration...


###### Launching Klipper host software...
Restarting klipper (via systemctl): klipper.service.
펌웨어 빌드 설정
3D 프린터용의 보드용 펌웨어 제작을 위해서 설정화면을 아래와 같이 실행하고 설정합니다.
pi@orangepiplus2e:~/klipper$ make menuconfig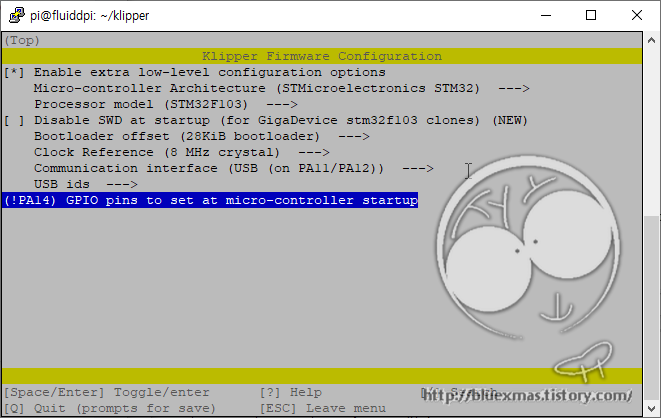
펌웨어 빌드
Configuration saved to '/home/pi/klipper/.config'
pi@orangepiplus2e:~/klipper$ make
  Compiling out/src/sched.o
  Compiling out/src/command.o

... 생략 ...

  Compiling out/src/stm32/hard_pwm.o
  Building out/compile_time_request.o
Version: v0.10.0-293-ge3beafbd
  Preprocessing out/src/generic/armcm_link.ld
  Linking out/klipper.elf
  Creating hex file out/klipper.bin
Orange Pi와 Ender 5 연결
3D 프린터와 연결된 USB 주소 확인
pi@orangepiplus2e:~$ ls /dev/serial/by-id/*
/dev/serial/by-id/usb-Klipper_stm32f103xe_38FFD9055641343421871443-if00
~/printer.cfg 파일 (Ender 5 with SKR Mini e3 V2.0 용)
알리에서 구입한 Micro Swiss Direct Drive Extruder for Creality Ender 5 클론 제품의 printer.cfg (지금까지 인터넷에서 찾아서 최적화 했음)
~/printer.cfg 파일 생성
pi@orangepiplus2e:~$ vi ~/printer.cfgprinter.cfg 내용
# This file contains common pin mappings for the BIGTREETECH SKR mini
# E3 v2.0. To use this config, the firmware should be compiled for the
# STM32F103 with a "28KiB bootloader" and USB communication. Also,
# select "Enable extra low-level configuration options" and configure
# "GPIO pins to set at micro-controller startup" to "!PA14".

# The "make flash" command does not work on the SKR mini E3. Instead,
# after running "make", copy the generated "out/klipper.bin" file to a
# file named "firmware.bin" on an SD card and then restart the SKR
# mini E3 with that SD card.

# See docs/Config_Reference.md for a description of parameters.

# [gcode_macro START_PRINT]
# gcode:
#     {% set BED_TEMP = params.BED_TEMP|default(60)|float %}
#     {% set EXTRUDER_TEMP = params.EXTRUDER_TEMP|default(190)|float %}
#     # Start bed heating
#     M140 S{BED_TEMP}
#     # Use absolute coordinates
#     G90
#     # Reset the G-Code Z offset (adjust Z offset if needed)
#     SET_GCODE_OFFSET Z=0.0
#     # Home the printer
#     G28
#
#     G92 E0 ;Reset Extruder
#     G1 Z2.0 F3000 ;Move Z Axis up
#     G1 X10.1 Y20 Z0.28 F5000.0 ;Move to start position
#     G1 X10.1 Y200.0 Z0.28 F1500.0 E15 ;Draw the first line
#     G1 X10.4 Y200.0 Z0.28 F5000.0 ;Move to side a little
#     G1 X10.4 Y20 Z0.28 F1500.0 E30 ;Draw the second line
#     G92 E0 ;Reset Extruder
#
#     # Move the nozzle near the bed
#     G1 Z5 F3000
#     # Move the nozzle very close to the bed
#     G1 Z0.15 F300
#     # Wait for bed to reach temperature
#     M190 S{BED_TEMP}
#     # Set and wait for nozzle to reach temperature
#     M109 S{EXTRUDER_TEMP}
#
# [gcode_macro END_PRINT]
# gcode:
#     # Turn off bed, extruder, and fan
#     M140 S0
#     M104 S0
#     M106 S0
#     # Move nozzle away from print while retracting
#     G91
#     G1 X-2 Y-2 E-3 F300
#     # Raise nozzle by 10mm
#     G1 Z10 F3000
#     G90
#     # Disable steppers
#     M84
#
# [virtual_sdcard]
# path: ~/gcode_files
#
# [display_status]
#
# [pause_resume]
#
# [gcode_macro CANCEL_PRINT]
# description: Cancel the actual running print
# rename_existing: CANCEL_PRINT_BASE
# gcode:
#   TURN_OFF_HEATERS
#   CANCEL_PRINT_BASE

[stepper_x]
step_pin: PB13
dir_pin: !PB12
enable_pin: !PB14
microsteps: 16
rotation_distance: 40
endstop_pin: ^PC0
position_endstop: 220
position_max: 220
homing_speed: 50

[tmc2209 stepper_x]
uart_pin: PC11
tx_pin: PC10
uart_address: 0
run_current: 0.580
stealthchop_threshold: 999999

[stepper_y]
step_pin: PB10
dir_pin: !PB2
enable_pin: !PB11
microsteps: 16
rotation_distance: 40
endstop_pin: ^PC1
position_endstop: 220
position_max: 220
homing_speed: 50

[tmc2209 stepper_y]
uart_pin: PC11
tx_pin: PC10
uart_address: 2
run_current: 0.580
stealthchop_threshold: 999999

[stepper_z]
step_pin: PB0
dir_pin: !PC5
enable_pin: !PB1
microsteps: 16
rotation_distance: 8
endstop_pin: ^PC2
position_endstop: 0.0
position_max: 300

[tmc2209 stepper_z]
uart_pin: PC11
tx_pin: PC10
uart_address: 1
run_current: 0.580
stealthchop_threshold: 999999

[extruder]
max_extrude_only_distance: 100.0
step_pin: PB3
dir_pin: !PB4
enable_pin: !PD2
microsteps: 16
# rotation_distance: 33.500
# rotation_distance: 33.00934
rotation_distance: 24.395
nozzle_diameter: 0.400
filament_diameter: 1.750
heater_pin: PC8
sensor_type: EPCOS 100K B57560G104F
sensor_pin: PA0
control: pid
pid_Kp: 21.527
pid_Ki: 1.063
pid_Kd: 108.982
min_temp: 0
max_temp: 250

[tmc2209 extruder]
uart_pin: PC11
tx_pin: PC10
uart_address: 3
run_current: 0.650
stealthchop_threshold: 999999

[heater_bed]
heater_pin: PC9
sensor_type: ATC Semitec 104GT-2
sensor_pin: PC3
control: pid
pid_Kp: 54.027
pid_Ki: 0.770
pid_Kd: 948.182
min_temp: 0
max_temp: 130

[heater_fan nozzle_cooling_fan]
pin: PC7

[fan]
pin: PC6

[mcu]
serial: /dev/serial/by-id/usb-Klipper_stm32f103xe_38FFD9055641343421871443-if00

[printer]
kinematics: cartesian
max_velocity: 300
max_accel: 3000
max_z_velocity: 5
max_z_accel: 100

[static_digital_output usb_pullup_enable]
pins: !PA14

[board_pins]
aliases:
    # EXP1 header
    EXP1_1=PB5,  EXP1_3=PA9,   EXP1_5=PA10, EXP1_7=PB8,  EXP1_9=,
    EXP1_2=PA15, EXP1_4=, EXP1_6=PB9,  EXP1_8=PB15, EXP1_10=<5V>

# See the sample-lcd.cfg file for definitions of common LCD displays.
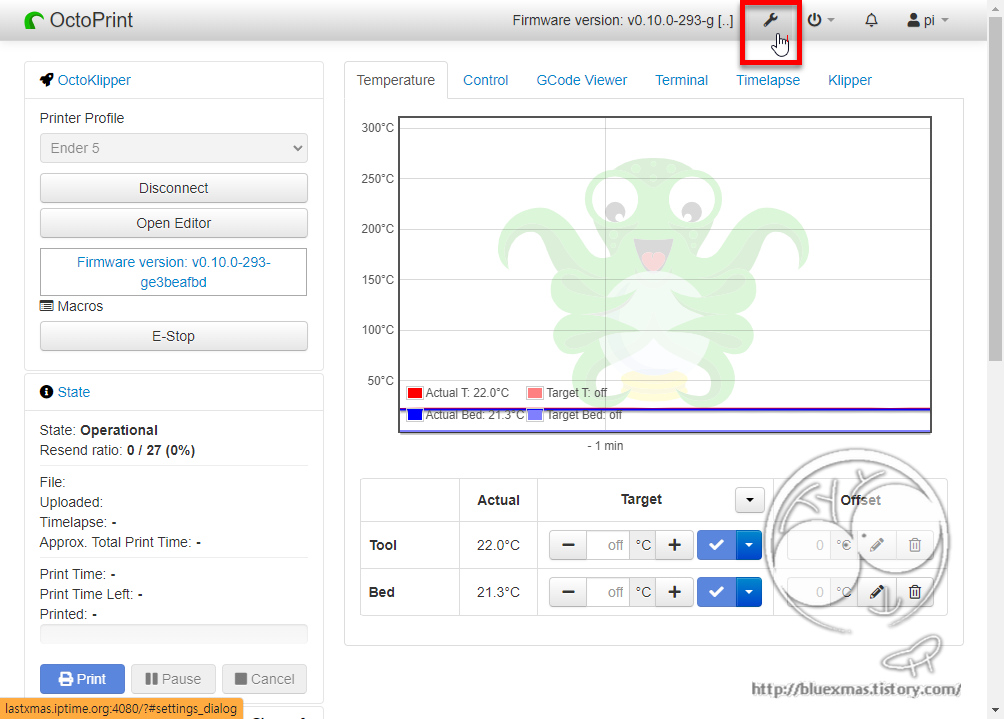
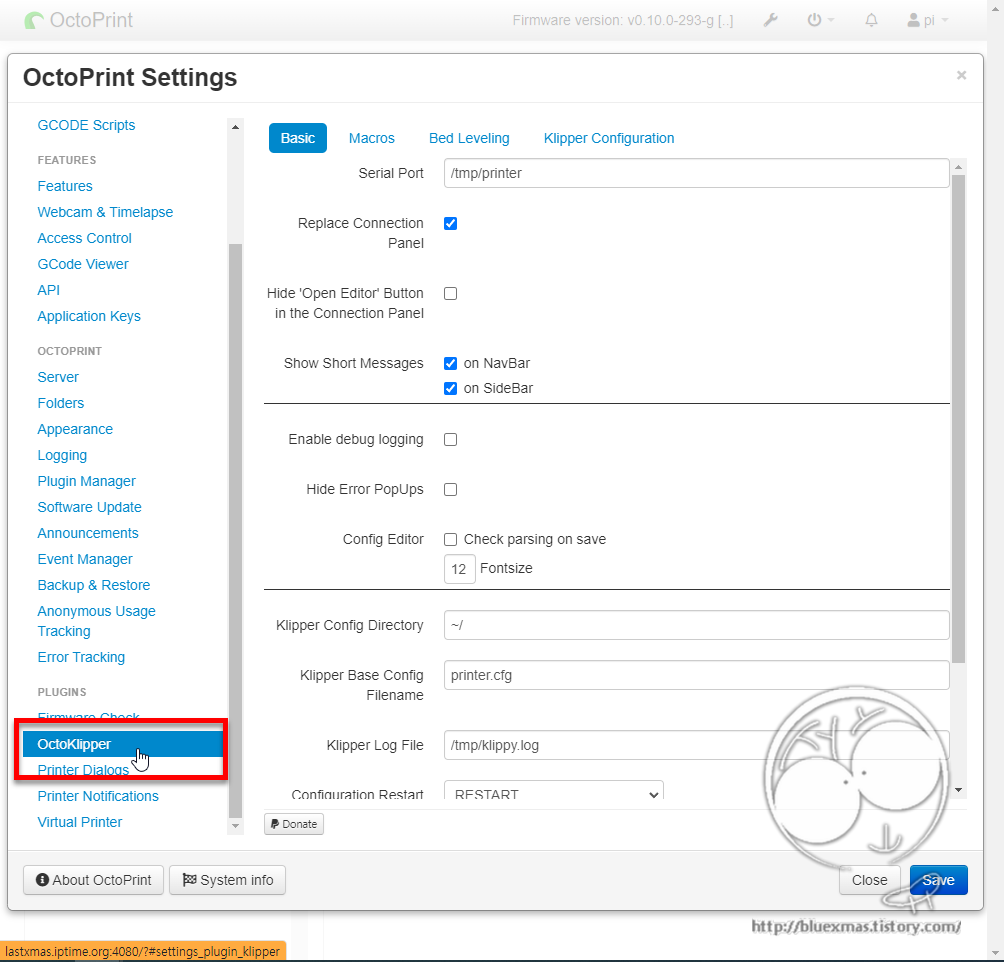
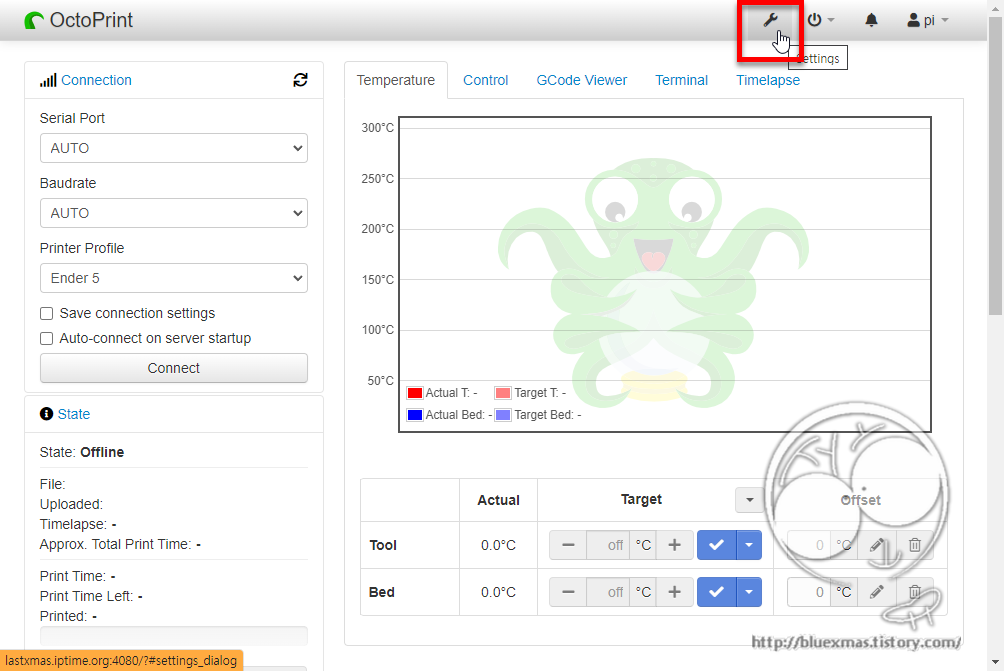
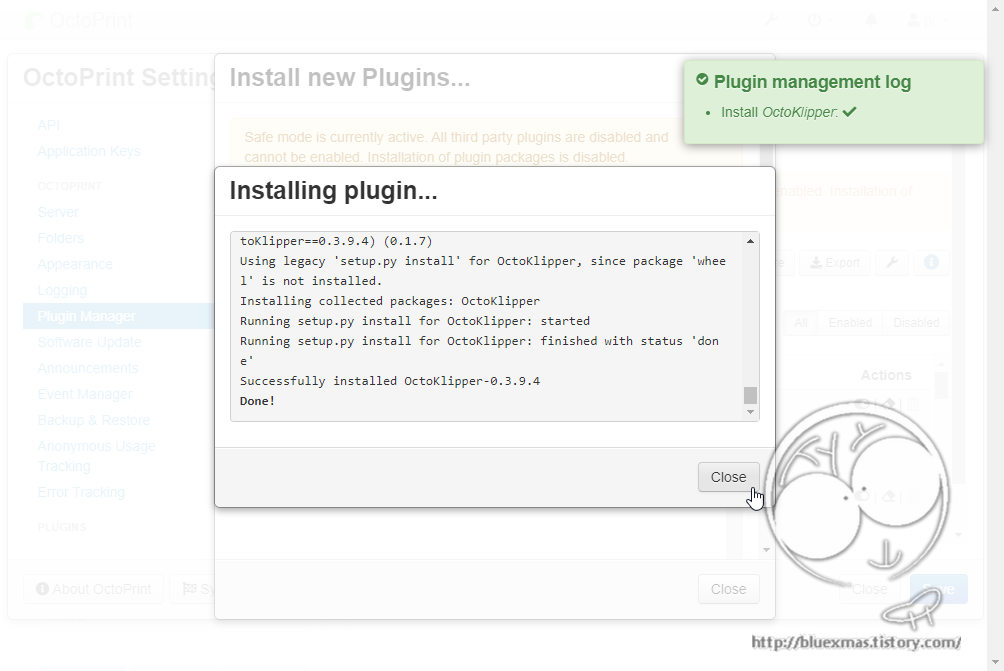
OctoKlipper - OctoPrint Plugin 설치
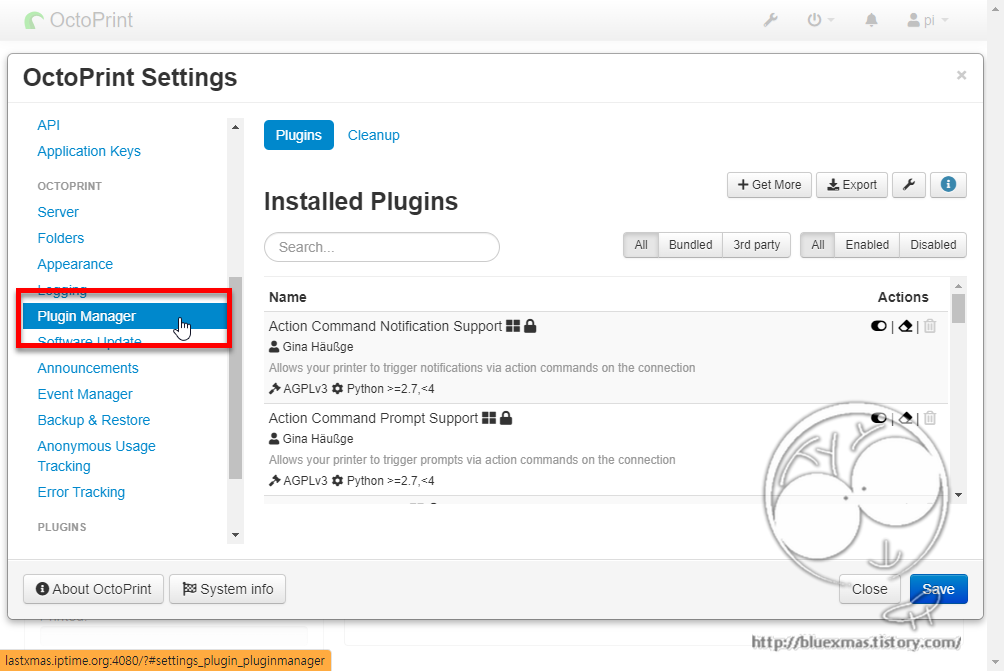
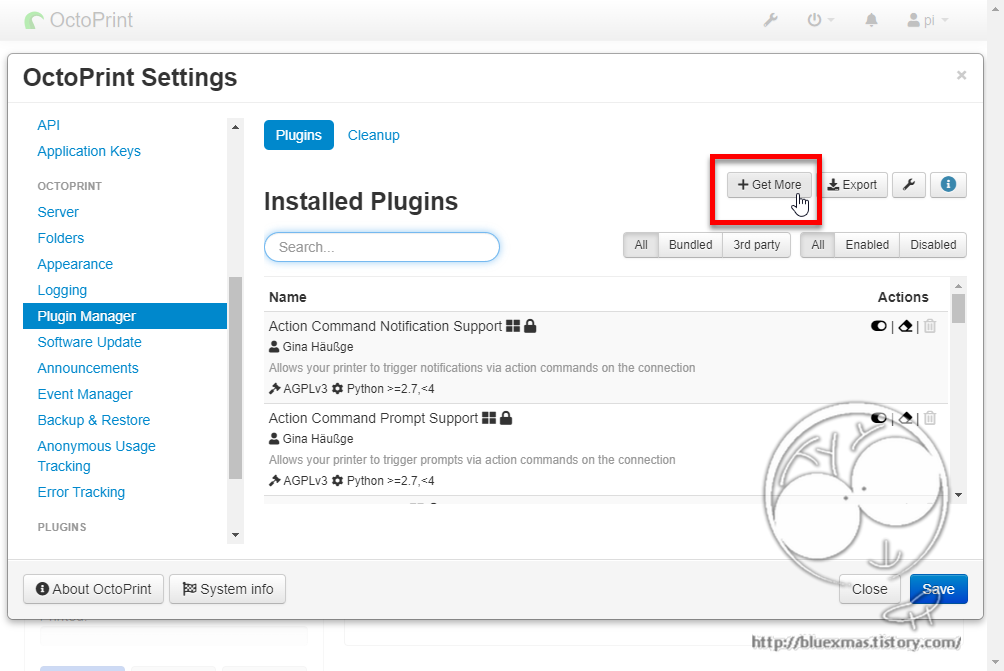
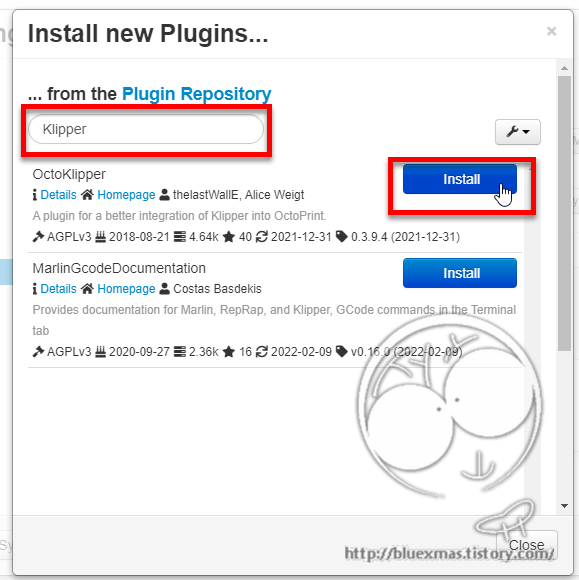
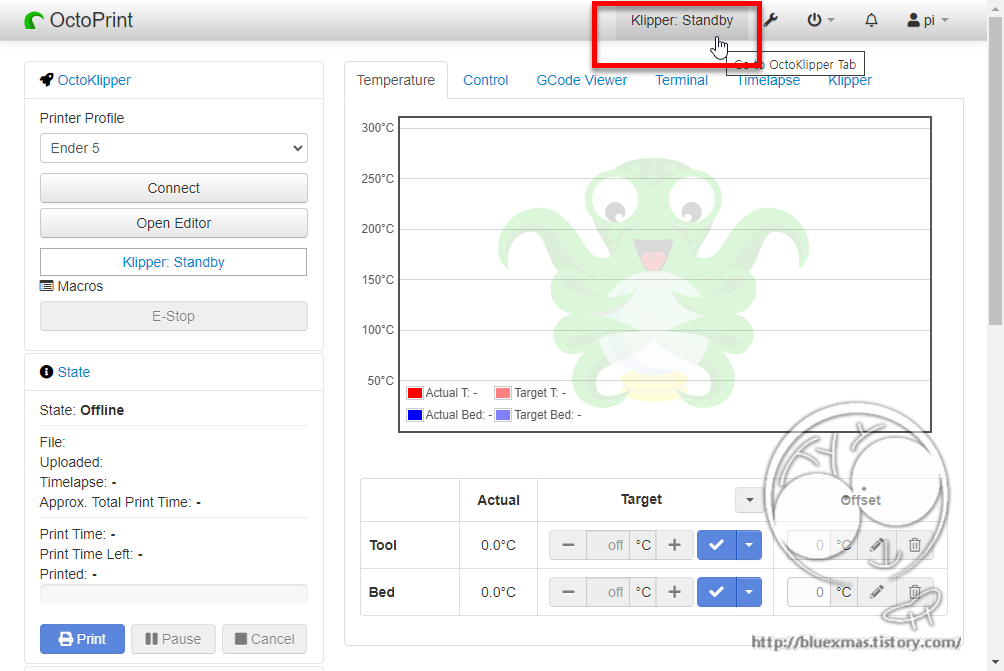
OctoKlipper 프린터 연결

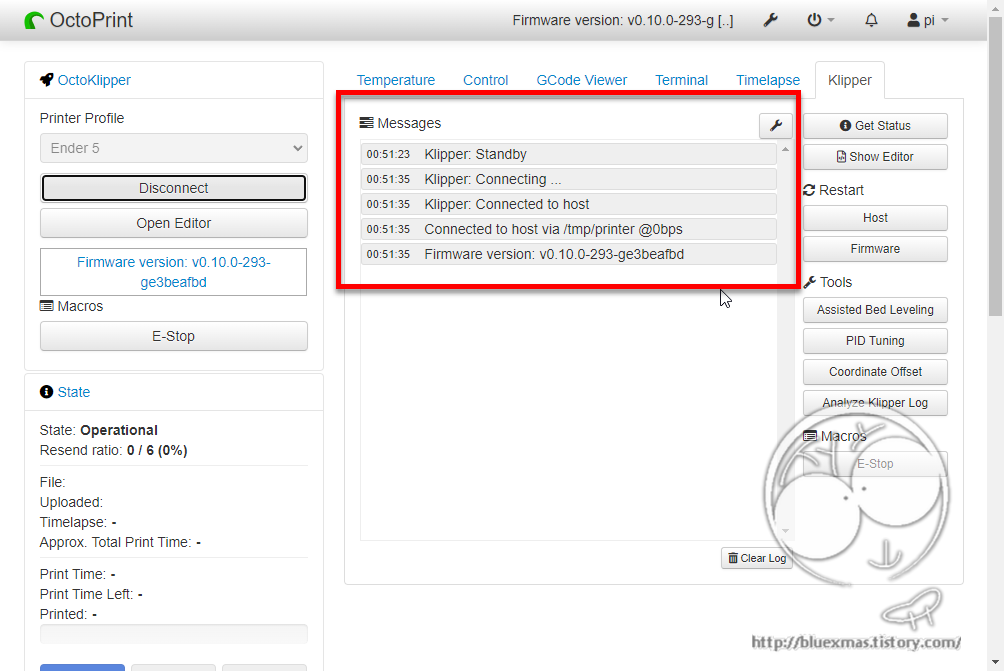
OctoKlipper 설정